Firmware
Version
1.40 Intel Viiv Support zip 3.4
MB
Version
1.38 Fixes (Auto-Channel) Disconnect Issue zip 3.4
MB
Version
1.23
GPL
Info GPL Info html 1 KB
WHR-G54S-Manual-web.pdf User's Manual
Install
DD-WRT (to www.dd-wrt.com)
Flashing
the WHR-G54S with DD-WRT (Original, may not flash your WHR-G54S))
dd-wrt.v23_generic.bin
TFTP Client for
Windows command-line, supports all versions except CE
TFTP (from
LinkSysy)
WPA Support
Can't Connect to Internet
It Won't Remember My Gateway Password!
Flashing the WHR-G54S with DD-WRT
This worked for me...
Who's in YOUR Neighborhood? (DD-WRT Site
Survey)
Client-Bridge Mode
Doing the SAMBA on the WHR-G54S (Samba
FS Automount under DD-WRT)
Open the WHR-G54S
WHRx Models
Power Adapter
Use 20 Character Key!
Use a minimum 20 character WPA Key.
DanS from alt.internet.wireless came to the rescue:
Power down all devices.
Turn the cable modem back on.
Wait until it has a solid link back to the cable co.
Now, turn on the router
Then the PC.
If you didn't power cycle the modem, it is still looking
for the MAC address that was connected to it before, NOT the router MAC.
If you try to enter a greater than 8 character password, it will let you type in a lot more than eight, but when you hit "Apply" the WHR-G54S won't let you log in with root-blank, nor will it allow root-"greater than eight". Now you have to hit the reset button under the WAN port.
Although.. Maybe it will let you type in a greater than eight character password, but will limit you to using only the first eight characters... I don't know, and I'm not going to try and find out right now.
Reset WHR-G54S by holding RESET down while powering it on. Hold 30 seconds, then remove power.
NOTE: Buffalo
unfortunately encrypts their firmware, and they'll only accept encrypted
firmware in their web interface. So the easiest way to replace the firmware
turns out to be the same way you would "de-brick" a router with corrupt
firmware.
Namely, all the broadcom routers enter a special mode
in the first few seconds after power is applied that allows a tftp transfer
to directly program the flash rom with new firmware. So what you need to
do is get everything ready to go, power up the router, and then send it
the new firmware quickly.
Type TFTP -i 192.168.11.1 PUT dd-wrt.v23_generic.bin. Do not hit ENTER yet.
Apply power to WHR-G54S. The port LEDs will all light up together. As soon as they go out, hit ENTER and start the transfer. (Thanks to Chewbacca on a Berlin forum!)
The LED on the LAN port will flash rapidly for about 6 seconds. The command will complete with a success printout, like Transfer successful: 3502080 bytes in 5 seconds, 700416 bytes/s. NOTE: If you use the -v option (verbose) the flash will take 30 seconds or more. There are over 6,500 blocks of data sent, and the -v option writes each block transmission to the screen. Pretty much a blur...
The router will reboot into DD-WRT, wait until the red bridge/diagnostic light stops blinking. . At this point, the router is ready to use. There is no need to reboot it (unplug/plug), although this is a safe precaution. The router will be now be accessible on 192.168.1.1 netmask 255.255.255.0. You will need to change your IP to this range to access it for configuration. (For the WB2-G54, the router is still accessible at 192.168.11.1). The username is 'root' and the password is 'admin'.
Flashing the WHR-G54S with
DD-WRT, ver 01 (PDF, includes comments)
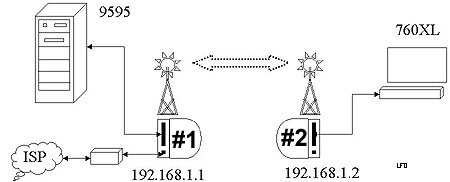
Two WHR-G54S, DD-WRT v23 SP2 generic
Router #1
Router #2
192.168.1.1 192.168.1.2
AP Mode
Client-Bridge Mode
DHCP Server DHCP
Server disabled
Loopback Disabled Loopback Disabled
WPA-PSK TKIP WPA-PSK
TKIP
I can ping both IP from either computer. This is NOT WDS.
Thanks to Tony Hwang and Bryant Smith reporting their experiences with
AP/Client Bridge mode.
This is on WIKI HERE
I have focused on shares on an NT4 system. YMMV.
1. Create a SMB network share on the host computer.
* This is the default file sharing
system on Windows. Right click on drive or directory and select "Sharing
and Security"
to set up sharing.
2. Use the Web Interface and go to the Administration
> Management tab. Scroll down to the
last option..
3. Enable the Samba FS Automount
option. If new options do not appear the "Save Changes" and go back to
the page.
4. Enter the share location in the 'share' field. eg:
//192.168.1.160/myshare
5. In 'user' and 'password' enter the user credentials
of a user allowed to access the share.
6. You may optionally enter a Startscript. I'm leaving
it blank.
So, if DHCP Clients shows:
Host Name IP Address
ARDENT 192.168.1.112
If I created a normal share for a drive (called "burn"), does this mean
that my Share would be //192.168.1.112/burn?
With a knife, slit the metalized plastic sticker between IP Address (Router) and IP Address (Bridge). Now remove the single T9 screw.
Remove the curved smoked plastic LED cover - The cover is latched on the side with the Reset Button. Use a pen or small screwdriver to depress and push the catches forward. Now the cover will rotate forward, pivoting on the end near the AOSS button.
Remove the blue plastic AOSS bezel - Simply push the blue bezel back towards the ports and the catches will unhook from the white plasticcase. Look at the ventilation holes. See the edges of the blue catches?
Open it up like a CD case, rotating on the back hinges.
Reassembly is easy. Put the blue AOSS bezel on, match the catches up with the ventilation holes, push it to the front and lock it. Now insert the AOSS end of the LED cover under the "AOSS" end of the blue bezel. Rotate the LED cover and push the other end underneath the catches on the white platic case. Make sure they click into place.
Board is marked WRTB-153G_VO1
Broadcom BCM5352KPBG RN0622.P10. covered with a heat dissipating pad.
RF section uses a Broadcom BCM2050KML G 2.4-GHz direct conversion radio
The memory chip is an ISSI IS42S16400B-7TL
Y1 is a 25.000 MHz xtal
On the back there is another ISSI IS42S16400B-7TL and a MX 29LV320CBTC-90G
Antenna uses a RP-SMA base. One aftermarket source is HyperLink
Technologies
| Model | Broadcom | Flash | RAM | Wireless | Switch | boot_wait | Serial | JTAG | USB |
| WHR-G54S | BCM5352 200MHz | 4MB | 16MB | Broadcom (integrated) | in CPU | - | Yes | Yes | No |
| WHR-G54 | BCM5352 200MHz | 4MB | 16MB | Broadcom (integrated) | in CPU | - | Yes | Yes | No |
| WHR2-G54 | BCM4704 264MHz | 4MB | 64MB | Broadcom (mini-PCI) | BCM5325 | on | - | - | - |
| WHR-HP-AG108 | |||||||||